Friday, September 28, 2012

Milani Fall Fashion Nail Trends: My Designs!

A few weeks ago, a lovely lady from Milani contacted me and asked if I'd like to create four nail designs inspired by four fashion nail trends. I, of course, jumped at the opportunity and I was so flattered that I was asked to participate. Many other awesome nail bloggers particapated as well and there were so many beautiful designs submitted!

Milani has posted all of the designs on their Pinterest page. I'm going to post my four designs below, but you should definitely go check out everyone else's as well!

The four fashion nail trends that Milani asked us to base our designs off of were: Haute Rod, Color Block, Glamazon, and Gilded Rebel!

Haute Rod: I started with one coat of Milani Black Swift. Then using both Milani Gold Glitz and Red Sparkle I made stripes while leaving some black for a half moon look!
 
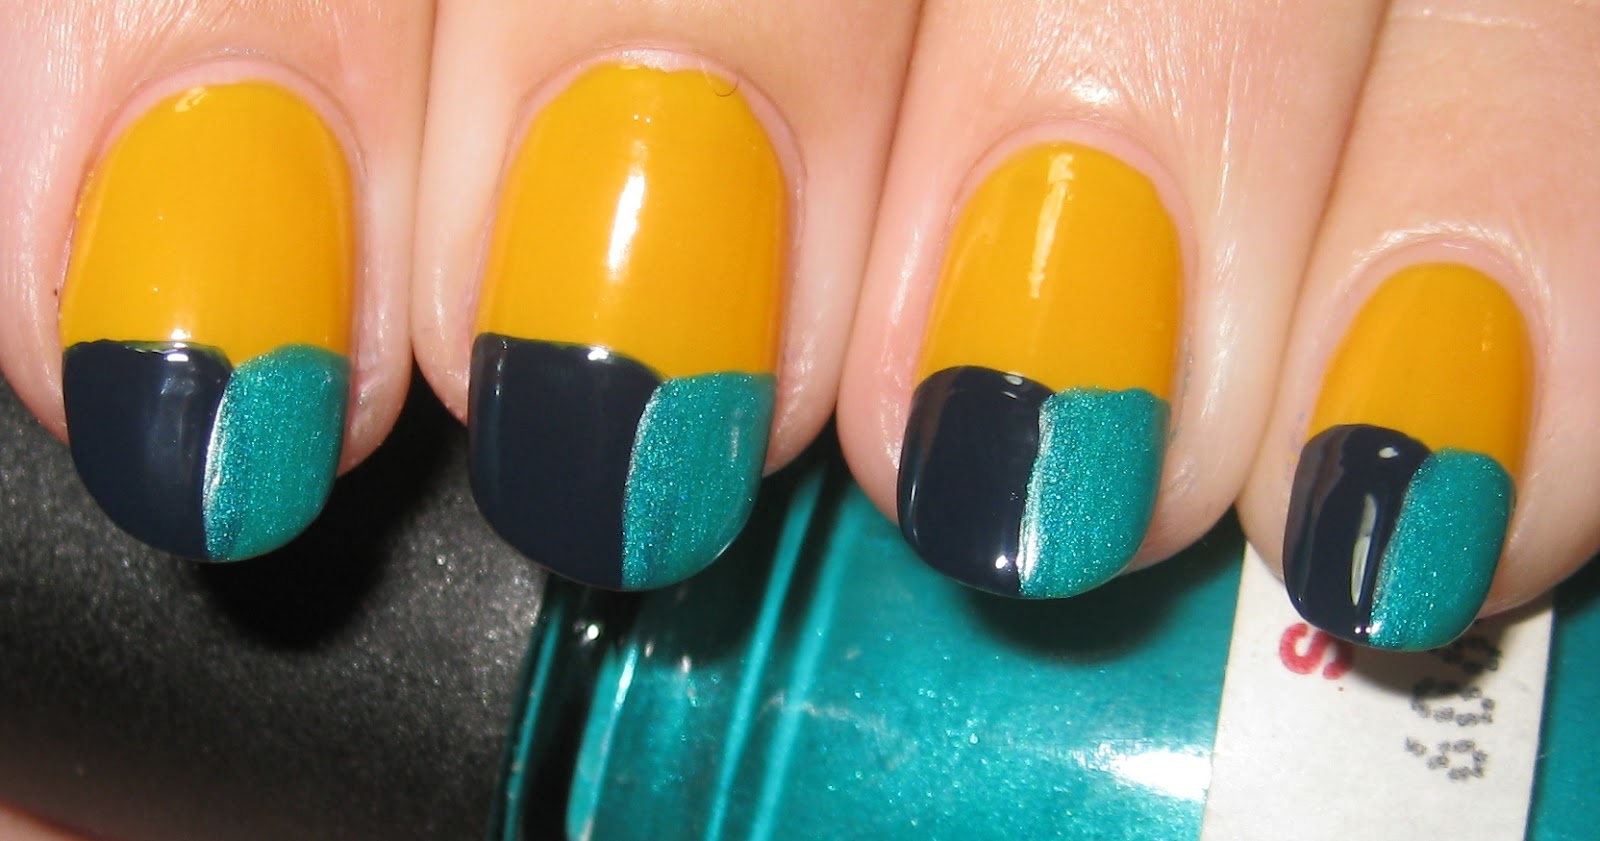
Color Block: For the white base I used Milani White on the Spot and used my striping tape to section off the triangles. The orange that I used was Milani Jiffy Orange and the red was Milani Rapid Cherry.


Glamazon: I started with one coat of Milani Black Swift and then did one coat of Milani Twinkle. For the glitter placement that frames each nail I used Milani Fuchsia.

 
Gilded Rebel: Since I was using neons for this mani I did a base of Milani White on the Spot. Then I did two coats of Milani Totally 80's and sponged a gradient using Milani Fresh Teal. Lastly, I did one coat of Milani Teal!
 
 
This project was SO fun to do and I still can't believe I was among the bloggers that were asked to take part. How amazing?! Like I mentioned above you should definitely go check out Milani's pinterest page to see all of the other gorgeous designs!
 
Many, many thanks to Milani for allowing me to participate in this! :)
 
*All of the polishes used for this project were provided for me by Milani.

Friday, September 21, 2012

Cult Nails Quench with gold leaf

Here's another one I found that I had not posted yet! You can tell it's obviously old because my nails are short and square. If you follow me on instagram (prettylittlebottles) then this will probably look familiar to you since I posted it there right after I did them!
 
 
I used Cult Nails Quench and the gold flakes that Cult Nails sells for this mani. Quench was opaque in two coats.

I added top coat to each nail and then took the gold leaf and placed it on my ring finger the way I liked. After I kind of patted in the flakes to make sure they all stuck, I added another coat of top coat over the flakes.
 
*This photo is courtesy of the Cult Nails website. All photo credit is theirs.*
Here is what the flakes look like. They are loose and they come in lots of different sizes, some of the flakes are large, while others are very tiny.
 

I really loved how this turned out, I need to do something like this again, but maybe with a royal blue or something!


The gold flakes are available on the Cult Nails website and they retail for $5 each. Quench retails for $10.

Wednesday, September 19, 2012

Nail fails?

The other day I must have temporarily lost my nail art mojo because everything I tried, I hated. Do you ever get days like that? It's sad when it happens!

I decided to share my failed attempts with you today. Maybe you won't think they are that bad?

Here's something I tried with microbeads. The tips are Maybelline Goody Plum Drop and I lined them with light turquoise microbeads. I just didn't dig this mani at all :/


This one started with a base of OPI Alpine Snow Matte and then I did some zig zag and straight lines with my migi nail art pens. This one was just ok to me, didn't absolutely hate it, but didn't love it either.


The base for this one is L.A. Splash Golden Seahorse and then I made a sort of Ruffian look with glitter. The glitter is Orly Sashay my way.


Tuesday, September 18, 2012

OPI Care to Danse? sandwiched with Ulta Indigo-go Girl

Hi!! You guys have probably noticed my blog got a little makeover! Thanks to my friend Steph, from Imperfectly Painted, I learned how to change my blog template and everything. Took me long enough, right?! For now I'm really happy with how it turned out, but it's not something I want to keep forever. One day I'd like to design a really cool Header and kind of create a signature look just for Pretty Little Bottles!
 
 
Anyways, today's post is a mani I did a few weeks ago and for some reason never got around to posting it!
 
 
I started with 3 coats of OPI Care to Danse? Then I did one coat of Ulta Indigo-go Girl and finished it off with another coat of Care to Danse?.

Indigo-go Girl is a really pretty, fine indigo glitter that also has very small indigo hex glitter.

I really enjoyed this combo! In a way, it reminded me of Lynnderella Nosegay.  


Saturday, September 15, 2012

Glitter Tips tutorial (YouTube video)

Hi guys! I have another YouTube video to show you!
This one shows how I achieve the 'glitter-tip' look using my new Avon nail glitter!


For reference I used Cult Nails Blackout (pictured below) as my base color and I used the new Avon nail glitter in Brilliant Chrome (pictured below) for my tips!

*Credit for this photo is given to the Cult Nails website*
Cult Nails Blackout


Avon nail glitter in Brilliant Chrome (silver)


Cult Nails Blackout can be purchased on the Cult Nails website for $10
The Avon nail glitter can be purchased on my Avon website for $3.99


Hope you guys like this video! All of your support, thus far, has been so great regarding my videos, I really appreciate it and it makes me so happy! As always, if you have ideas for me or if there is something in particular you'd like to see, please let me know :)

Friday, September 14, 2012

OPI Pink of Hearts 2012

This past Monday I went to Ulta after my class to hunt for this new set by OPI. I was very disappointed when I couldn't find it! I was just about to say "Oh well" when I decided I'd ask a sales clerk just for the heck of it. I really didn't expect them to even know what I was talking about, because that's happened to me in the past, but the sweet girl I happened to ask said, "Oh, the new one with the pretty glitter?!" I was like "yes that one!" She smiled wide and said, "Do you want it really badly?" I then smiled and said, "yes please!" She said, "Ok, they're in the back still boxed up, give me a sec and I'll get it for you!" Oh my god, I wanted to hug this girl! I love when sales clerks are super helpful and sweet like that! So, thanks to her, I brought home these two pretties!
 
The OPI Pink of Hearts set for 2012 consists of a pink glitter with fuschia hex glitter (You Glitter be Good to me) and a pink creme (I Think in Pink). I bought it for $14.95 at Ulta!
 
For this mani, I did 3 coats of I Think in Pink on each nail and then I did an accent nail with one coat of You Glitter be good to Me on my ring finger.
 
I Think in Pink is a semi-sheer polish. I woudn't call it a jelly, but it did have a sheer-er consistency. It's really a beautiful pink polish! I mainly bought this set only for the glitter, but then I was pleasantly surprised about how much I loved the creme as well!


I love how the caps have the breast cancer ribbons on them! It's great that OPI has a breast cancer awareness set each year, this is the first year I have bought one!
 
What do you guys think about this set?

Thursday, September 13, 2012

Avon Suede nail enamel in Touch of Taupe

You guys remember my mini Avon haul post?? Well, I finally swatched that Avon suede nail polish and I gotta admit, it's a stunner!

Here is Avon Suede nail enamel in Touch of Taupe:

For those that don't know what the "suede" finish means, it's basically a matte nail polish. Usually, with suede polishes, though, there is gorgeous silver shimmer. You can see what I mean in these pictures. This polish covered in two perfect coats!


Here is Touch of Taupe with a shiny top coat:


I REALLY love how this polish looks both matte and with top coat. Sometimes, suede and matte polishes can be annoying application wise, but this polish honestly glided on. The Avon suede collection includes this polish and five others. You can check out the full collection here. They are currently on sales for only $3.49 each. If you are interested in purchasing them, I have an Avon website and the direct link to these polishes is here.
 
So far, I only own this polish from the collection, but I'm honestly going to have to get a couple more of these, if not all of them! lol I have an addiction people!

Tuesday, September 11, 2012

Stamping Tutorial video for Rochelle!

Rochelle if you're out there, I made a stamping tutorial video for you :)

If any of you ever want to see a how-to on something please email me or comment somewhere! Even if you just have an idea for some nail art, let me know. I love getting suggestions!


I hope all of you like this video and, Rochelle, I hope it's helpful :) !

Sunday, September 9, 2012

80's Earrings nail art #2

Hey guys! Remember this post from a few months ago? Well, I'm back with more!
 
Here is how they turned out:
 
 
And here are the earrings I was inspired by:

 
These earrings are my personal favorites from all the pairs that I found that day! They are so colorful and fun.
 
 
Here are the supplies I used for the details in the design:
 
For the fine line detailing I did with the pink and green I used two of my migi nail art pens, they have a super fine tip (see below) and are great for drawing lines. I used my nail art brush to do the turquoise swirlies and to paint the navy and turquoise sides at the bottom of the nail. Lastly, I used my dotting tool for the dots.


Here's a quick step by step on how I did these nails:
 
I started with two coats of Spoiled by Wet n Wild Designated Driver

Then, using my nail art brush, I first painted the left side of my nail, about half way down, with a navy polish (Avon Empower). I painted the right side with a turquoise polish (Chin Glaze Turned Up Turquoise) using the same technique.

Lastly, I went in and did the detailing. I used my nail art brush and the turquoise polish and did little swirlies at the top of each nail. I used my pink migi nail art pen to do the crooked line under the swirly. All the dots were done with a dotting tool. And the little green arrows you see on the left side of each nail were done with my lime green migi nail art pen.
WHEW, that was a lot to say, I hope I didn't lose anyone!
 
As you can see, I didn't do the EXACT design of the earrings.

If any of you ever attempt to do designs inspired by objects or other designs you see, just know it doesn't have to be perfect! You can see that some of my lines are wonky and stuff isn't placed exaclty so, but that's what adds to the appeal of these nails! And if you look closely, you can see that the earrings aren't perfect either!

These were really fun and crazy nails. I'd love to go to some 80's party or rave and re-create this look!


Friday, September 7, 2012

I'm on YouTube!

Hey Guys! I just want to do a quick post tonight to let you guys know that I am now on YouTube!

If you follow me on Instagram, you saw that I uploaded my first video yesterday. It is just a simple video on the way I do my nails and some tips on clean up, etc.

I am really excited about my first video and I can't wait to work on more in the future! Let me know what you guys think about it (be gentle though, I'm so new at this video thing!) and also let me know if there are specific videos that you guys would like me to make! :)

I'll be back tomorrow with some nail art...in the meantime...here's my video:

Wednesday, September 5, 2012

Enticing with Avon nail glitter tips!

The other day I was helping Maria, of Cult Nails, roll polish "burritos." While we were rolling I couldn't help but stare at her nails. They were so pretty! She had Cult Nails Enticing with a coat of Cult Nails Doppleganger and then iridescent glitter on her tips. If you follow her on instagram (cultnails) then I'm sure you saw her picture of them.

Well since I couldn't get these nails out of my mind, I knew I had to attempt them myself. Plus, I had just received my Avon purchase that consisted of the new glitters (see post below).

So, here is my version of Maria's nails:

I used three coats of Enticing and then let it completely dry. Then I put top coat where I wanted the glitter to stick and then just dunked my nail in the glitter container.

These nails are so feminine and pretty; I just feel like a ballerina, fairy princess (too much?) with this combo on my nails.

It's a lot sparklier in person, if you've got some glitter and a color like Enticing handy I suggest trying these nails if you enjoy soft looks like this!!

Here is what the Avon nail glitter looks like and the container it comes in. This one is simply named Iridescent.

Here is a picture I posted on Instagram after I finished these nails. That was the glitter aftermath and the only way it can be described is a "beauitful mess"
 
 
The Avon nail glitter retails for $3.99 and can be purchased from my Avon website. You can find Enticing on the Cult Nails website and it retails for $10.

Mini Avon Haul!

Hey Everyone! Just a quick post to show you some new things that Avon has come out with that I recently bought!


These are some adorable nail art rhinestones that came out for Halloween! Look at that packaging, how cute!


Avon also came out with some nail glitter that I was super excited to try. It comes in a darkish silver and an iridescent glitter. These are seriously awesome! (my next post uses the iridescent glitter on the right)

Lastly, Avon is coming out with six new suede nail polishes. This color pictured here is called Touch of Taupe. These aren't available yet, they will be next week. I have access to some products early because I am a rep, but don't worry, I will have this swatched for you all soon! :)


The Halloween rhinestones and nail glitters are available now on my Avon Website! The nail glitters are $3.99 a piece and the rhinestones are $2.99.


Stay tuned for my next post that features one of the new nail glitters!